- Version
- Download 11115
- Dateigrösse 43.32 KB
- Datei-Anzahl 1
- Erstellungsdatum 10. Januar 2021
- Zuletzt aktualisiert 27. Januar 2022
- Download
German
Dieses Free Callout Titel Pack kannst du frei für commezielle Zwecke verwenden.
Installation der Free Call Out Titles:
Lad dir einfach das Zip File runter und Enpacke es.
Mit DR17 installiert einfach die drfx Datei doppelt anclicken.
Oder Ziehe die drfx Datei in die Nodearea in Fusion (Davinci Resolve 17)
Falls du ein Popup bekommst in dem Steht "File could not be installed" copier das drfx File einfach in den Templates Ordner.
- Geh in Fusion
- Öffne die Effektlibary
- Navigiere zu Templates
- Klicke auf die 3 Punkte am oberen rechten Rand des Effeklibary Kastens
- Klicke auf "Show Folder"
- Kopiere die drfx datei in diesen Order
- Starte Davinci Resolve neu
Anwendung der Callout Titles Presets:
Ein ausführliches Tutorial zu Anwendung findest du hier: https://youtu.be/K8v-KqVMgOs
Du kannst die Call out Titles einfach aus der Titles Setion deiner Effektlibary auf statische Shot anwenden indem du folgendes tutst:
- Suche in deinen Titles nach Call Out
- Ziehe einen der Call Outs in die Time Line
- Passe die Parameter an um den Gewünschten Effekt zu bekommen
Wie du die Callout Titles etwas Tracken lassen kannst:
- Ziehe einen Adjustment Clip in die Timeline
- Gehe mit dem Timeline Playhead über ihn und gehe in Fusion
- Suche nach einer Tracker Node und tracke Einen Punkt
- Suche aus der Effektlibary den Callout Titles und ziehe ihn in die Nodearea
- Clicke mit Rechtsclick auf den startpunkt "Connect to" -> Tracker Path -> Position
Anwendung der Trainingsfiles:
- Ziehe einen Adjustment Clip in die Timeline.
- Ziehe diesen Adjustment Clip in den Mediapool.
- Lösche den Adjustment Clip in der Timeline
- Ziehe den Adjustment Clip aus dem Mediapool in die Timeline (Das resetet die Startframeanzahl zu Null (wichtig)
- Gehe in die Effektlibary und suche den Callout Title
- Ziehe den Call Out Titel Effekt auf den Clip.
Detailierte Anwendung der Trainingsfiles:
https://youtu.be/8CVcoTVkn_o
Lizensbedingungen:
Dieses kostenlose Preset kannst du gerne für kommerzelle und private Projekte nutzen. Der Weiterverkauf der Presets ist nicht gestattet.
Du musst mich auch nicht erwähnen, aber es würde mir natürlich helfen, wenn du das tust.
Englisch
There are 2 Kind of files in here
The DRFX file with Titles that you can install and use from the Editpage.
And the Trainingsfiles that you can use as expamples for your own learning.
Installation
Just dobble click the drfx File.
Or Drag the drfx File into the Node Area in Fusion. (Davinci Resolve 17.2)
In case that you get an Error saying that the file could not be installed, just copy the drfx file into the Templayte folder.
- Go into Fusion
- Click on Effectlibary
- Navigate to Templates
- click on the 3 dots in the upper right Corner of the Effectlibary Frame
- Click "Show folder"
- This is the Folder you need to copy the drfx file to
- Restart Davinci resolve
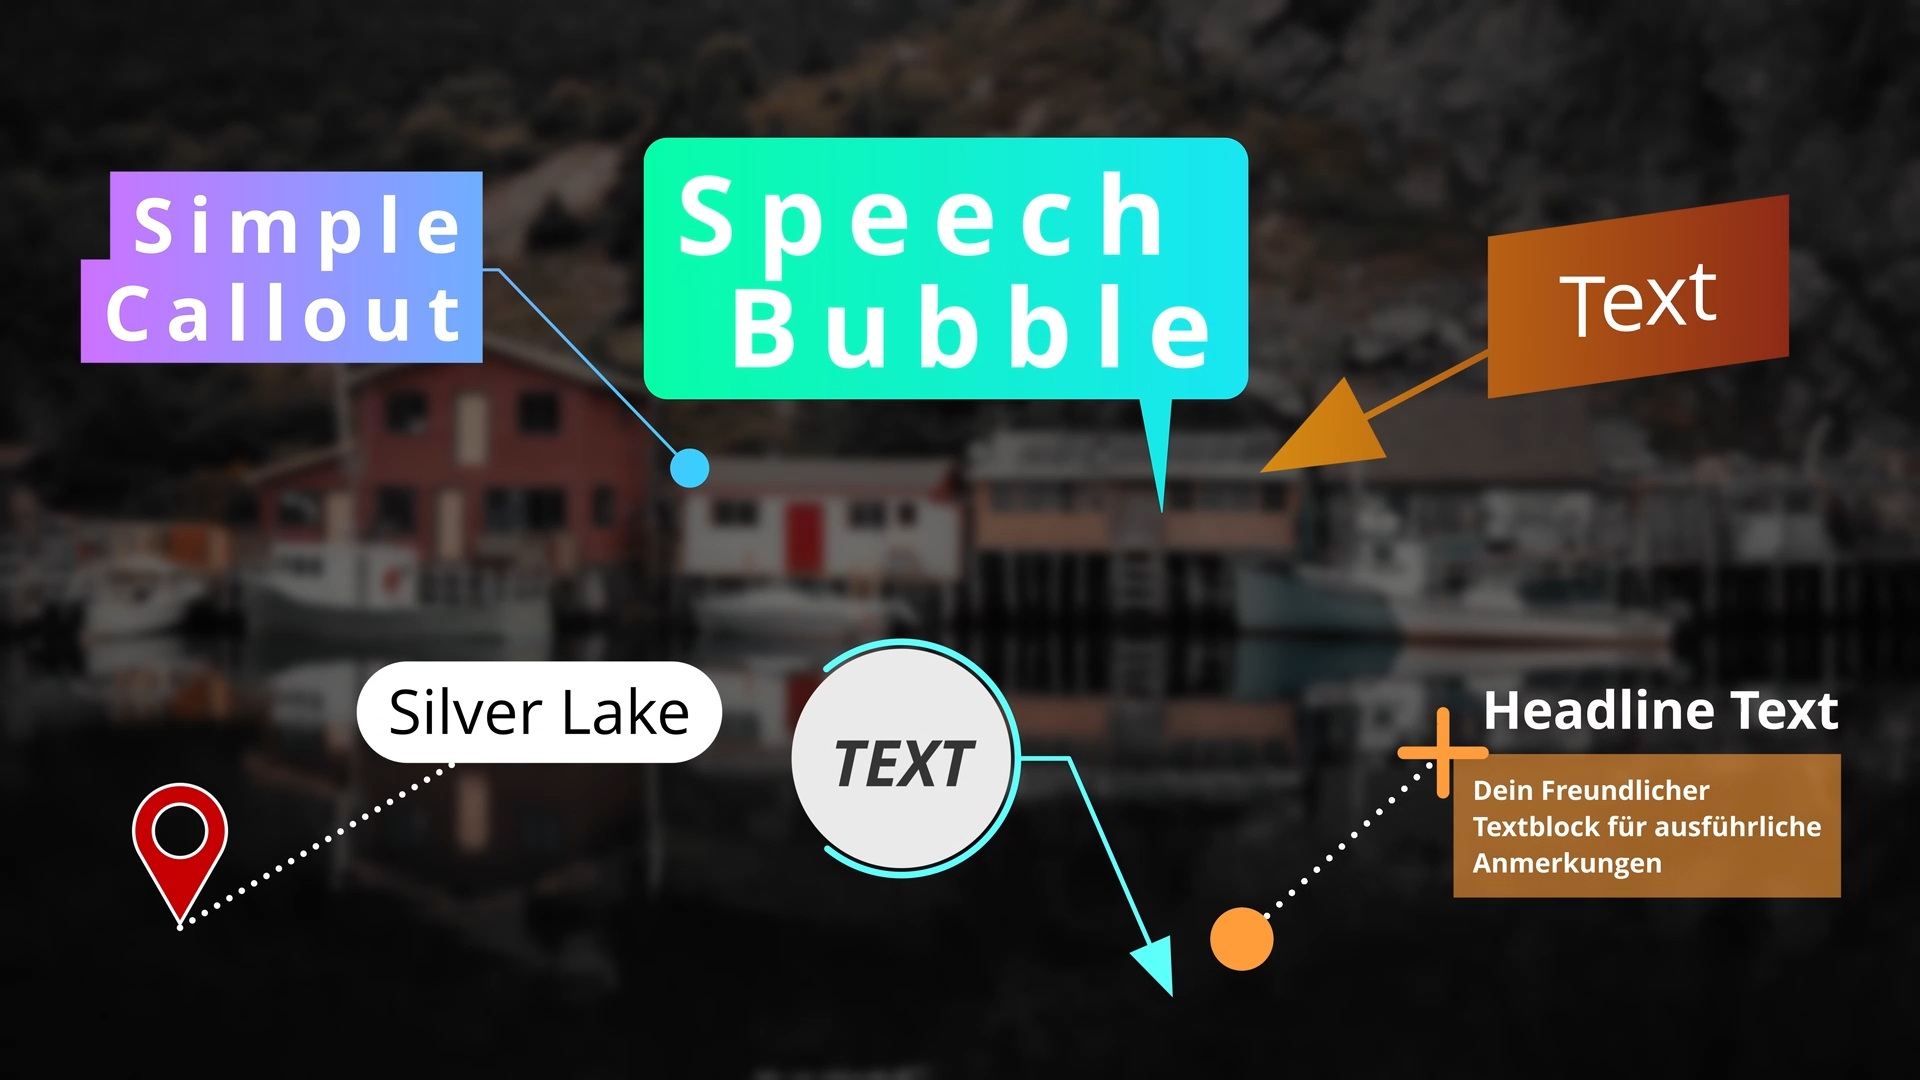
How to use the free Call out Title files:
You can use the Titles als Standalone Titles on static shots
- Search for Callout Title in your Effektlibary
- Drag the Callout Title into the Timeline
- Adjust Parameters
How to make The Titles track an object:
Detailed Tutorial: https://youtu.be/K8v-KqVMgOs
- Drag an Adjustmentclip from the Effectlibary onto the Timeline
- Go into fusion
- Open the Effekt libary and drag a Callout Title into the Node Area
- Search for a Tracker and track a point
- Click on the Callout Title group
- in the Inspector rightclick the Start point and choose "Connect to"->Tracker path -> Position
Trainings files Usage:
- Drag an Adjustment Clip into the Timeline.
- Drag this Adjustment Clip into the Mediapool.
- Delete the Adjustment Clip in the Timeline
- Drag the Adjustment Clip from the Mediapool into the Timeline (That resets its Startframecount to 0)
- Search in your Effect libary for "call out"
- Drag the Callout Effect from the Effectlibary onto the Adustment clip.
Detailed Explanation on how to use the Trainingsfiles it:
https://youtu.be/8CVcoTVkn_o
Licence:
You can freely Use this Preset also in non-commercial and commercial Projects but not sell it or provide this preset elswhere as a Download.
No need to credit me but it helps.
Hi,
thanks a lot for your work 😉
Thanks Bro you are Welcome.
Hey, beim Herunterladen ist bei mir nur ein leeres File. (Call out Titel 01 R (2) . Setting)
An was könnte Dies liegen?
Gruss Simon
Hey das könnte daran liegen dass der Callout in DR17 erstellt wurde und Fusion in DR16 die Shapenodes nicht lesen kann.
Ich schau heute Nachmittag mal rein und Update das file auf eine DR 16 Version
Hey Simon,
ich hab das Settingsfile geupdated.
Es kann sein, dass es daran lag, dass du die Font die ich genutzt habe nicht hattest. Das habe ich jetzt aber behoben.
Es gibt jetzt auch einen DR 16 Freundlichen Version.
Hallo Johannes,
vielen Dank für deine Mühen.
Es ist immer wieder interessant deine Videos anzuschauen und zu Lernen.
Gruß Heribert
Danke dir 🙂
Infusion reingehe habe ich keinen Trecker drinnen
Hi Thomas ich habe sie erst kürzlich geupdated.
Sie funktionieren jetzt auch als Title
Daher musst du sie ein klein wenig anders handhaben.
Ich hab hier ein Ausführliches Tutorial gemacht:
https://youtu.be/K8v-KqVMgOs
Danke
Thank you so much for this , you are doing a great job
Thank you so much for this great work
Thank you so much for this great work
Thank you so much for this great work